The fender length is determined by your inseam. You measure crotch to floor and then subtract two inches from that. That is compared to the paper pattern you are using and then either lengthened or shortened from the middle to the upper third, depending on the shape of your pattern. You will just have to choose your fender pattern and either fold or cut and stretch the space and as I did onto another poster board to maintain the original for next time. Now as you will notice the fender patterns have legs on them. That is where the stirrup will go and the stirrup leather will be joined to it, after passing around the bar of the tree, and the post end of the Blevins buckle will go on the fender side and the slider goes n the other side of the long strap. So while you are measuring your pattern you need to curl the leg back and place the stirrup you plan to use in the curl. Now measure the bottom of the stirrup to the top of the fender. I did have to go shorter with my fender due to my shorter legs.


The fender shape has been chosen, reshaped for length and cut out to fit me. I also made it a straighter version along the forward edge because I am doing the outside of the fender stirrup leather strap on the face of the fender style. The edges got rounded with a large edger and then slicked with a fast moving slicker by hand. No pressure is used just the heat from the fast movement. Then I traced the leaf design I had drawn onto the face of the fenders up from the bottom to where the pattern should appear plumb and at a right angle. This was about four inches up from the bottom. These lines got followed with a sharp swivel knife, then those cuts were beveled and the design accentuated with a veiner and pear shader stamping tool. I later went back and added some back grounding and some lifting on the leaves. There are tons of videos on the internet about tooling leather. A couple of my favorites are Bruce Cheaney and Don Gonzales. They are totally inspiring me to become better and better. Their work is phenomenal and they both really seem to enjoy sharing and teaching their craft, for which I am so grateful.


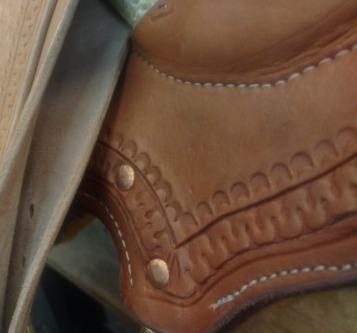
Using a wing divider making a slow careful trace around the fender about 1/4 inch in a light mark, stopping about 3/8 inch from where it ran into the leaf design already stamped on each side of it. Then in from that approximately 1/8 of an inch and other trace around the fender. These two will form a bead. Then another trace around again this time in another 1/2 inch, which forms the channel for the meandering pattern. Then again one at another 1/8 inch, but no bead this time it is just a placement mark for the sunburst camouflage tool used later. The lines on either side of the 1/2 inch channel space is then cut smoothly with the swivel knife going steady and slow. That cut helps to make a groove for the meandering tool to set in when making the Carlos pattern.

Carlos is a curvy snake like pattern between the two lines.This type of pattern is called a meandering pattern. It can be made in several designs using a few of some assorted three point stamps or one shaped like an hour glass that reminds me of a metal "I" beam. With one side being a straight bar for your base line and the center making a point into the channel you marked with the "T" pointing its leg toward the center of the band in the different shapes available. Mine is basic, (from Tandy), with a little tiny cotton swab shape going out from the center of the bar in to the channel. You run a straight line of these exactly side by side on the bar side of the stamp going down the swivel cut. Then you go back and center that q-tip shaped center piece on the opposite side swivel cut and stamp it there. As you repeat this the "S" shape forms. I had to go back in a few places where the bars on the cut side came together and stamp down with just a small straight tool to get the little teeth that sometimes formed between the stamps. Paul is using the hourglass or "I" beam stamp on his saddle and he is not doing the bead. Just a channel for the Carlos strip. You don't join the bar part of the stamps on the cut side, you allow a little space between each stamp. This design looks a little more like repeating "Z's" rather than the "S" and may be the actual true "Carlos" pattern. I like them both.


I also chose to tool the stirrup leathers. you arrange so that your plan will be to place the thinner end of your stirrup leather at the bottom end of the leg on your fender. You mark the stirrup leathers, (matching each other), so as to start your pattern about three inches below the beginning of the leg under the curve of the fender bottom and take the pattern to about three inches above the fender. I again made the marks as before on the forward edge and placed a bead and tooled in the Carlos pattern down just the leading edge, but before I did the camouflage stamping I ran another mark and additional 1/4 inch in and used that line as the base line for my slanted basket weave pattern. I did four rows of that and just left the back edge plain for about the last inch. A little asymmetrical. Then I ran the sunburst camouflage stamp between the basket stamps and the meandering Carlos in the channel. Paul is tooling his too but wants to run the Carlos channel up and down each side of the stirrup leather. Then also around the front and back side of the fender.
At this trip we also worked on our rigging pieces. Paul's being separate and mine in the skirt.
He had cut his out with a scroll saw last trip and now he is prying open the two leather layers where the places are for the four brass pieces to go and to make room to slide them in. Once these pockets were big enough he marked and stamped wholes for the rivets. He attached the rivets with the rivet tool and dead blow hammer and then cut them pretty short with wire cutters or dikes. He smashed in the cut end of the rivet to make it mushroom and smoother and then turned it over and domed the top of the rivets. Kind of makes them look more like snaps that way and more finished looking. You cant round brass though.


I got my two layers of skirt cut out and glued them together leaving the room at the tips of the bars at each end to create pockets. If you will notice the middle picture the white paper is cut out further than the leather and that it has the shape of the bar, (after tracing it while pattern was on the tree). That is the pattern for placing the glue.
After casing the leather at home I tooled the Carlos edge on the top side of both pieces at the lower edge marked out as before with the bead and the meandering tool marks making the pattern for the Carlos. After the Carlos border was done I followed with a row of the sunbeam camouflager.
Then as you can see there is a place in my skirt to place the rigging. The rear rigging piece will go in the rear jockey, continuously trying to lighten the weight. And all of this leather is quite heavy and strong so it will hold as well as a separate rigging in my opinion.


Thanks again for stopping and checking out our saddle series.
コメント