#7 Layering of the Ground Seat
- Paul Phinizy

- Apr 25, 2019
- 6 min read
Updated: May 17, 2022
This lesson begins with us cutting out a piece of medium leather basically the shape of the entire strainer. Adding about an inch and 1/4 around the back end of it, the seat end. The rest matches the front end of the strainer. We actually made this pattern before we put the strainer in. Mark this leather for center down the length of it. Again mark the saddle where you will place the contact cement on the seat. Place the contact cement in the area you marked and then the smooth side of the leather. Wait a few minutes and carefully put it into the saddle so your marks all line up. Starting at one end and aiming for the other smoothing it out so there is no air bubbles or high spots under it.


Then of course you skive some more. Skiving is the hardest part to learn in this saddle making so far. You think you have it done well and Randy says no, "more", "down to a feather." He keeps saying that. Now this is just around the outside edges, you want to keep the centers of the layers high in the front center, or the rise. Like I said "you are building" a ground seat. Sloping it smoothly toward the edges of the bars and where the end of the cantle comes down around to the seat. We scraped so much off we were seeing the metal again on the outside edges of the strainer. That is good.
I really can’t stress enough to keep skiving long after you think you are done. On the furthest outside edges you want to see a real pale color of leather. This means you are down to the bottom. You really do take a lot back off. This is where the art comes in. Skiving wet leather helps a lot. But then you have to let it dry, mostly anyway, before you put contact cement on it. A hairdryer on low is ok. The making of a custom ground seat. If you are not doing a padded seat, (which we are not), the only thing over the final layer of ground seat is a single layer of leather which may or may not have some tooling on it so smooth is important.


So, we skive and skive some more. When we finally get where we are going we understand and see where we are supposed to be with the completed layers so far. The next layer, 3rd, will cover the whole of what we just did and a bit further to the edges of everything.


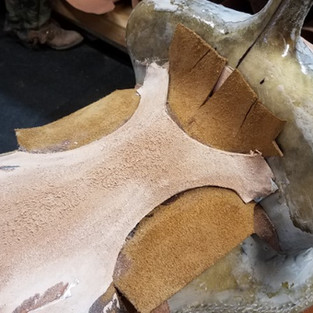
Now we address the pieces of leather that are up in the curved cut out areas of the strainer on its sides where the stirrup leathers will go. We don't touch the gullet/fork end yet. Here is where your draw down strap on your saddle stand comes in handy. You are going to be pulling hard so do make it stationary somehow. Cut into the side flaps in a sunburst type pattern about an inch apart at the metals edge up to 1/2 inch from the metal edge. You want the tabs to be able to get to the top of the ground seat without seeing the slits. Apply contact cement to both sides of where you will be folding it over. An inch or so.
Use plenty but not too much cement. Wait your few minutes and using a pair of pliers from the opposite side pull hard. Pull one toward the center of the curved metal edge toward the center of the seat. Then work your way out to each end along the whole edge of each side pressing down hard. A little hammering it down is also helpful. Then more skiving until it is all smoothed in and now you have a very professional edge. Some saddle makers just cut this off here flush with the metal. You never see this edge but Randy was taught this way and likes it and it does create a better seal for the edges of the leathers inside. I like this method, I like that it seals the layers and I like the look too, even though you won't see it.


Next, we are cutting a layer of our lightest leather to cover the front shape of the strainer plus about an inch and a half to go up the swells. Then enough to cover the seat minus about an inch. We set this rectangle piece in the seat that measures 12 x 18, we came up with that taking a tape measure to the area, a soft fabric style one. We cut that out and mark the center longways with a pencil. Get it wet, set it in the seat lining up center marks and then we scribe around the seat keeping that one inch margin, but just on one side, and then down around the end of the cantle keeping about a half inch margin around that curve. Also, the front neck of the strainers edge should be hammered a bit to leave a mark so that you can cut that shape out. Cut this mark all the way across so it matches all the way across, keeping that front edge vertical still. Then softly fold not crease on the center line and cut the other side of the seat to match. The sides of this get left long the full 12 inches wide.
Then go skive the entire outside edge, except the front center in the cut out or hand hold some people call it. Down to a feather edge and make a nice slope. Go inward about two inches all around, except for the front center. Remark your center that got skived off.
Check for fit, you might need to trim a little bit up around the fork side toward where it meets the sides. As you are doing this you will notice the side flaps cover where the stirrups come out. That is good, it is creating a pocket for the stirrups and will add to the shape there.
Now you are going to mark the outside edges front and back on the saddle side for contact cement lines. also mark the back of the seat piece by turning over the saddle. You could also use your strainer pattern piece that indicates where the curves of the metal are. We don't want any cement on the side flaps of this. Replace and shape into place. Now the piece is formed and curved in a couple of directions. Let that dry completely, probably overnight. Then put contact cement on both sides and wait the few minutes until tacky. Start at the hand hold center holding the sides up while you smooth toward the back then the front sides go down and smooth to the back.
You should put your stirrup leathers plugs back in while you start skiving the seat piece. You want to blend it and smooth it feeling for any slight lumps and work to skive that all smooth. You This fourth layer is the last layer, in these saddles, before the final seat. Sometimes there might be more layers depending on what you want for a final shape. For instance, if you wanted a taller rise in the front or you can also add to the back of the swell while you are doing the layers if you want or need to in order to make the seat flow nice.

We took our trees home to watch TV in and set a while so we could find the spots that need to be smoothed. It really helps a lot for the owner to really try it out at this point. Randy has done this with most of his saddles and his clients. There have been a few where he had to go with just a smooth feel and he would check it for himself, but the owner is best! If you are making a saddle for someone, send it home for a week if you can and have them draw circles where they feel something they shouldn't. Then recheck a second time. You want the best seat you can accomplish when it is all said and done. Randy can't emphasize this enough!
Thanks for stopping in to check on our progress.


Comments