#8 The Saddle Horn
- Paul Phinizy
- Jun 13, 2019
- 12 min read
Updated: Aug 9, 2019
Once you are completely happy with the ground seat you address the flap of leather hanging out up in the hand hold area. Cut this in a sunburst type pattern using five slits. One in the center and two on each side of that center one. Go to about 1/2 inch of the edge of the front center. While tree is strapped down using pliers pull back hard and get an idea of how it is going to work out. If you need to cut a little bit closer so you will get a nice smooth curve do it now, but try not to go any closer than necessary so that your leather goes all the way to the top of the ground seat without any slits in the front of it, especially in the center because it is taller there. For neatness of appearance and professionalism on the front side of the gullet it looks best if the slits don't go down into the hand hold. The top will get covered. add some contact cement to each half let set and pull into place with the pliers. Then skive that smooth and down to a feather on the inside edge.


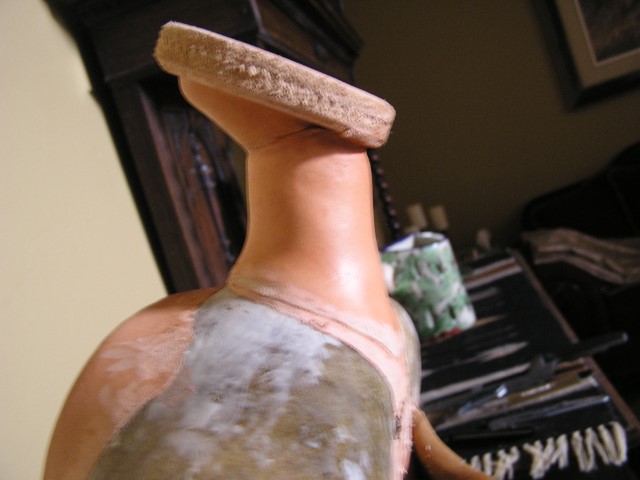
Moving on to the horn the next step starts out with cutting a circle an inch larger than the top of the horn. You use your heaviest leather for this. Then do a tracing of your horn on that with the tree up side down with the horn on the circle you cut smooth side up. Scribe around the horn reaching under it a little so it is slightly smaller than the horn. Mark the front to keep a constant placement of front center while you adjust the size. Cut that hole out. Try it on front facing outward. The piece will be glued on flush with the top of the horn rough side up. So continue to trim it creating a bevel going outward toward the bottom of it, the upper rough edge being the tightest or smallest of the bevel. That will help the doughnut to stay in place setting on top of the horn. You are aiming and trimming so that this doughnut sits flush with the horn and doesn't fall through.


Next cut another circle, now from light leather from an area that is stretchy, like near the arm pits, 6 to 8 inches across. After measuring from the front center middle of the horn to to the top edge of the horn passing the tape up into the bend under the top, plus an inch and doubling that. For mine I went with 8 inches and Ollie went with 7. Then measure the diameter of the horn in the center. Cut that circle out of the center. My center cut out was 2 inches and hers an 1 1/4. Then cut a straight slit from the center to the edge. Wet this and skive the center hole area down to a feather all around the center whole. Skive the rest of it to make it thinner down to half of what it was. Check for evenness and smoothness. You can see it in the picture as it has been stretched out by wet skiving and now looks sort of like a fat "C". Try this horn wrap on the horn to check to make sure the center hole is large enough to go around to the back and be able to pinch together at least a half inch. If not cut the center a little larger and re-skive. Once happy with your piece make sure it is still wet but not soggy and apply Elmer's to the rough side. Apply Elmer's to the neck of the horn about half way up spreading up under the horn to the edge of the top. Allow this to tack up for a few minutes.


Be ready with a clamp, (either a binder clip or a squeeze clamp), and a stitch. So a heavy saddle stitching thread and a needle to accommodate plus a sharp awl to pierce two holes. Clamp the tree down and facing the horn place the center of the hole about half way up the horn with the rough side facing up. Being careful not to get glue on the smooth side. Wrap the flap ends around toward the back leaving about an inch to go past the outside edges of the horn top. Pinch real tight at the base of the horn top. Leave a tiny space about an 1/8 inch to make your stitch. Place the clamp tight up to that stitch space. Pinch the leather tight all down the back of the horn center making a seam. Smooth the front around and up under the horn lip really well. Re-pinch the back to get it as tight as possible. You should not need any more than the one clamp, the smashing of the two side together should be sufficient.
Take your awl and pierce two holes one on top of the other as close to the tree as you can go, the top one being level with the top of the trees horn. Then the other one down a tiny bit but big enough for a nice stitch. Keep the awl horizontal so you are going straight through. Next run the needle and thread thru both holes and tie a tight knot.

Next take the doughnut you made and place it smooth side down facing front center and smooth the rest of the lower pieces extra inch up under it. Use a bone folder to smooth and crease the leather good up underneath close the outside edge of the horn. You will putting stitches around there close to the horn top and having that tight up in there will make it come out real nice. Let that dry.
Now you get your liquid nail back out and put a thin layer across the top of the horn filling that ring around the horn between it and the leather. You should do several layers letting it dry in between layering until it is absolutely flush. Using a drywall grader to sand in between applications of the liquid nail. Let the final layer dry.
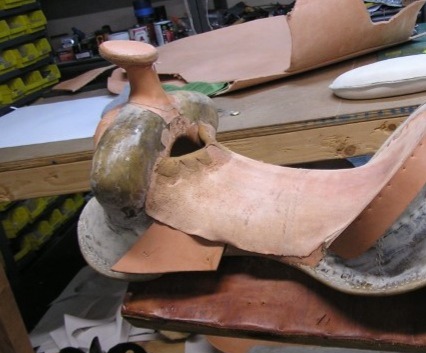
After that is dry cut the seam off of the back and skive the seam flat. Skive up to the bottom of the horn top using a small curved blade, (exacto type but uses a meatier wooden handle). Skive the lower edge of the horn neck leather smooth up under the overhanging top piece. You want the two sides of the bottom circle to have a single meeting place in the center on the underside, (center picture). Skive all the bottom edges smooth.


The next horn wrap is a strangely shaped piece that has a oval sort of shape in the first 2/3 of it. The second two thirds curves down, this is not a "duck bill" type horn. This horn has an edge all the way around it. This piece gets cut out of thin stretchy leather. Wet it and the back gets skived pretty thin down the center of this, about half, and then the edges to a feather. Do not skive lengthwise very much at all because it will stretch and distort your piece of leather because it is a stretchy piece. Go from the middle outward and all around. Still wet apply Elmers glue to the rough side. Just a medium layer not heavy and let that tack up a few minutes. With the piece in your hands facing the back of the horn and the short side to the right, place the oval piece centered on the horn neck with the top being allowed to fold over and up under the top horn lip piece about 1/4 -3/8 inch, (this covers the seam in the piece underneath). Wrap the short one around to the front snugly going across the front of the horn smoothing it to the contours of the horn neck and then under the longer side and back around to the back of the forks down toward the gullet piece. Place two staples to hold it temporarily. The bottom edge of this first wrap should be heading downward from the horn base onto the shoulder of the forks. Then pulling the longer piece tight go around front and around the other side sloping onto the other shoulder and sticking the end of it down into the hand hold. Make sure every thing looks good and is tight and smooth and covering both shoulders and down enough in the front center. Pull tight and place two more staples to hold the long piece. Use the bone folder to push the overlapping piece at the top up under the lip so it sticks in close and tight to the horn top. Smooth it all out and wipe up any extra glue. Let that dry and then above the staples cut the strips across and remove the bottoms and staples.

Next, keeping the skive marks below where you would have the whole cut for the swell cover. There is not a lot of leeway here so be very careful. Maybe try the curved knife again. Go slow and be careful to not get your skive marks up too high and also not allow for any bulk under the swell cover. Easy does it. Unless you use a horn wrap the leather part here below the horn top is visible and needs to be smooth and nice. Try not to nick it. You could use some blue tape on it to protect it if you are worried, as long as the leather is dry.
Now trim your circle on top of the horn to about 1/2 inch larger than the bottom outside of the horn. It is best to use something to help you determine a happy medium for this measurement. I went with 1/2 inch and Ollie 3/8 inch. Using a depth gauge we took it around the horn marking where the widest part of the horn was below. Start with four marks up on top spaced quarterly around and these should be just outside the center on top where the liquid nail is. Using a wing divider find the center after a few tries and you are looking for a perfect circle. The marks you made may be a little off so find the center. So if one way you have 1 1/2 inches and the other you have 1 3/8 inches go with the bigger. On the back side of a pretty to look at stiff heavy piece of leather use the wing divider you just set and draw out a circle. In this case three inches. Cut this out. This is the part of the saddle that gets looked at the most. Pretty is important. You also have to protect it until your saddle is delivered to the new owner, or at least until it is done, with something soft and fluffy. Randy had made a small pillow case type thing out of imitation fleece with the fluff on the inside. I am using a fluffy stretchy thick wool sock folded back on itself a few times.


Now take the drywall sander and sand the top of horn one last time making sure it is level pulling up the sides if necessary to find level. This time you will place contact cement on the rough side of the circle you cut and the top of the horn. Wait your few minutes until tacky and carefully place the final top piece in place centered perfectly. Press down and be very careful not to get any contact cement on the very top. It needs to stay clean and pretty. Let that set a few minutes.


Now take your skive knife and skive the three layers together all even, keeping track of your space underneath you do not want to go past 1/4 inch, even 3/8 inch. You might need some extra room in case you mess up. Keep the circle round and the edge at a 45 to the top, use the grader from time to time, check for round. Right now the edges should be square to the top circle the sides at a 45 to the top. When you are happy with the shape take a knife and cut a bevel around the top about 1/8 inch into either side of where the two sides meet. Go slow, be careful. Keep the top even all around with what you are taking off. Then do the same on the bottom leaving at least 1/4 inch still there. If you lay the horn down anywhere to get to the bottom protect it with your protective fabric. Yes this is nerve wracking. Using the grader again smooth out the bevels so it is a nice sweeping half circle. A nice smooth rounded edge stopping to check progress from time to time. When satisfied it is done. Check two or three times for happiness.

Wow, OK, at least now it is the shape you want and this next step would be harder to mess up. Get a bucket and sponge and dampen the edge of the horn also wiping the neck and the front of the gullet cover. You don't want spots. Get out your slicker and start slicking. You need to move your slicker rapidly and do not push down it will start to deform. This rapid motion makes heat and kind of melts the edge all together and becomes shiny. It starts to look really great after several minutes and you become really happy with yourself. The first pretty visible piece of saddle, such accomplishment!
Now another nervous part. For this we used a Dremel tool with a tiny drill bit in it. This one was hung from the ceiling but if you don't have one of those a hand held would also work or even a drill preferably a light weight one. You can also use a diamond shape cutting awl to pierce the holes. Then you will also need a thread puller. It is a leather tool with a needle like tip that has a hook cut into the side of it near the point, kind of like a crochet hook. This and the drill bit should match. But before you get busy you need to determine the stitching line. So you use the depth gauge again being very careful not to mark the top and check your spacing all around again. You also measure the top and hopefully it is still round and divide that in half for the wing divider spacing. Now you may need to make some adjustments to this for slight oval or lack of spacing underneath. But do your very best to get it round even if you have to get a little closer on the inside back edge or a hair larger there. Now put a piece of leather in the center of your horn to protect it from the wing divider and WITHOUT MOVING IT find center again doing trial center placements until you have where you need the center. WITHOUT MOVING THE LITTLE LEATHER PIECE draw your circle very lightly. Next squeeze your wing divider down to about 3/8 of an inch. This will be your stitch length. Starting at the center back go around making marks right in the circle you drew. First the you make two marks then move the back pin to the front mark keeping all the marks in the track you made. Be careful! Go slow and stay in one direction so all the spaces are even except for maybe the last one or two you can adjust to fit in, but you want those in the center back.


Now for the Dremel tool. Dampen the top so the thread will pull down tight. Try to keep your cool and start drilling in the center front of your marks choose either left or right side and drill three holes at an angle, (this is where the nerves come in again). You have your top mark but what is the angle? Without getting close to the top leather with your tool do some trial angles until you have the right one. You want it to come out near the edge of the horn and still in leather near the edge. You want the hole to be in a fairly smooth circle also. This is where people check to see how good a saddle maker you are! That and the cantle, it's the hand stitching they look at. Do three to five holes at a time. Get about 36 inches of sun proof saddle string & thread in the color of your choice and then stick your thread puller in the center front hole and put the thread in the hook and pull up toward top. Split the thread half for half and stick your thread puller in the next hole. Pull the bottom thread up to the top making a loop about an inch big. Take the end of the top thread and lace it through the loop. Pulling most of the thread from the bottom and tightening the top pull both threads tight until you are pretty sure the thread crossover is in the middle of the leather. Yes, hard to know but try. Continue drilling and sewing until you hit the back center being very careful you stay in your track and come out well on the bottom, (you should have the saddle secured for this at a good height). When you get to the bottom center pull the top thread to the bottom and tie a knot. Start back again at the top front center a few holes at a time. To start the new thread you put the thread puller in the first hole you did being careful to turn the hook away from the original thread. Hook in the second 36 inch thread and pull half of it up to the top. Continue as before ending in the hole you ended in before and then tying another knot. Dab with super glue and trim threads short. Now doesn't that look fabulous!


Thanks again for stopping in and hope to hear from you again.
Edited by Ollie Phinizy
Comments