Hi, you are hearing from me, Ollie the wife. Paul has to many chores to get to this week. He has been putting up a new round pen and is trying to finish it up. As long as I have your attention, I want to let you know how much I am enjoying this saddle making process. I am totally intrigued and trying so hard to pay attention, take notes and photos so this will all be remembered. Paul and I take turns with the notes and pictures and then we also quiz each other later on. We really want to do this again and hopefully again after that.
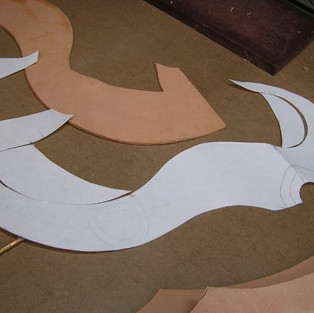
Today Randy is going to send us home with homework on building a white poster board saddle. We spent a lot of time looking over Randy’s saddle pattern pieces. Skirts, rear jockeys, seat jockeys and fenders. Today we will cut the fenders and stirrup leathers here with Randy before we leave so we will be deciding on those for sure at this lesson. We both went with similar versions to the one at right below.


We looked at all of his pattern pieces and traced and cut our own of those we were interested in. Our instructions are to go home and place these on the tree and use tape if needed and put it together as many times as necessary until we find what we like. I wanted round in the back and Paul wants to stick with something square with slightly rounded corners.


Now anyone can certainly look around online and order a saddle pattern of their liking. There are a lot out there. But Randy would certainly suggest that once you got it that you also put it on the saddle tree in this fashion. It may need a little tweaking. A little longer or a little shorter which can easily be done by either folding over a section, like putting in a pleat, to shorten a piece in either direction and/or do as we did and make a completely new pattern in the new shape as part of the process. Same would go for making it longer or wider, by either cutting it and adding a bit of space or sliding it over while you are making the new pattern tracing. You can also make changes to the curves and the widths or lengths of each piece. Remember it is custom, but the poster board allows you to make these changes easily. Poster board is cheap, leather is not.
I found my rounded skirt pattern and traced me a new one. I had to add a little because the pattern was originally for a 14.5 inch saddle. Paul found his rounded corner squarish skirt pattern and made a new one. Plus we made a couple of maybes. We copied Randy's standard seat jockey which he has used on all of his saddles, (most all), which is a very nice shape. We are not working on the back jockies as yet so nothing to work on there.
Once we got these home we set Paul's tree up on a tall saddle stand and went to work. The skirt goes under the bars to we centered it there from front to back, but also lining up the sort of pointed area toward the top front on the pattern. That spot goes at the back edge of the gullet where it meets the bars. It will be screwed down at that spot. You also look to see if the back center meets your center line marks. Use some blue painters tape to hold everything in place.
Then we lined up the seat jockey at the edge of the seat also paying attention to the curve around the forks swell in front and where the concho screw goes at the back by where the cantle comes down and meets the bars, more tape. Now we get here and Paul wants to make a change in the shape of Randy's seat jockey design so it runs a little straighter across the bottom. Not a huge change, but that is what custom is all about. It will be the way Paul has it in his mind.
We happen to have a back jockey here at the house because of the Cisco we took apart and it is in the kind of square shape Paul is looking for so we set it up there and have a look at it. Paul is liking the way it is looking. We also set the poster board fender under the seat jockey and have a look. Paul thinks he also wants to add a little to the length (front to back,) of the skirt, so he does so toward the back. So you can see that once you have your own pattern pieces that that is just the beginning. Just a starting point really to take an idea any direction you choose.
We were so involved we didn't take many pictures. But we hope you can see where we are going. If you do decide to make your own saddle it is highly recommended that you take this step before you start cutting into this nice expensive leather.

I put mine together in the same fashion. This is when I realized I needed to make the pattern longer, about an inch. No difficulty in that, just another piece of poster board drawing one half of it to the middle-ish then just sliding it to the left about an inch and finish tracing it. I did make a few marks to keep it lined up.
My skirt is going to have the rigging in it. So I did the best I could on my own trying to place it properly on my now longer saddle skirt and still getting it at 7/8 position. I was going with brass trim on my saddle so I had picked out a rounded rigging piece that was a little pointed on top and had a flat area on the angled top part with some rivet holes in it. The whole thing is about 3.5 inches wide and maybe 4 inches tall. It is a piece designed just for rigging the saddle up.
Now, when we got back to Randy's after playing with paper saddles he put a drywall T square up to it just behind the swell and let the T go to the floor and leveled the tree in the stand. I did not think of that, I just eyeballed it. I had gotten it real close we only spun it counter clockwise maybe a 1/4 inch. I did like the new adjustment better.
So then we got out my light leather side and I cut 2 mirror images of the skirt after tweaking it for some time getting all the curves just right. I had slimmed mine down looking to end up with a little bit of a lighter weight saddle when complete. I do not like swinging a 40-45 pound saddle. That is why I went with in skirt rigging. So I trimmed it down and then had to re-adjust all the curves to make it look smooth running along it's edge. So when satisfied I cut the 2 pieces leaving a half moon shape cut out where the rigging "D" goes.
Then Randy had me trace the tree onto the poster board skirt pattern while it was sitting in proper position under the saddle. He wanted me to cut it away so I could use the new piece. I chose not to do it that way so I drew out a new pattern and then made the other piece. I wanted to retain both pieces for reference at any later time I might need it. After I got that drawn out he had me shorten the sections at the front and back ends of the bars. These squared off sections will create pockets for the skirts to fit into over the bars. He uses this "pocket" method for assembly of his saddles. There are a couple of ways to attach the skirt to the tree, including using the saddle strings to tie it on. It seems cowboys who ride in the brush a lot like this pocket method and that is also how Randy was taught. This will work well for us too as we ride in the brush a lot too. The shape of this piece is a little hard to explain so please see the picture. So then I cut these odd pieces again mirror of each other and then skived out where the tips of the bars sill go. These two leathers get glued together with each part smooth side up. They will get edge stitched with the wool at a later step. Making the inside corners smooth tapering down toward the edge of bar area making it smooth as not to be felt by the horse. This piece is also a bit of a plug because it takes up the space of the bars so they fit more smoothly into the skirt as a whole. This will also help the seat and rear jockies lay nice. This is also the top piece under the seat jockey and the rear jockey. So it will be seen and tooled just a little around the bottom edge. You could also make this just the final piece in the back and go with no rear jockey at all and tool more of it if you wanted to. I think I might want the rear jockey because I like that layered look.


Paul's rigging is separate in a layer above the skirt and hidden below the saddle jockeys. It is the next piece to be attached to his saddle. He makes a copy of Randy's rigging pattern and cuts two sets of mirror images. The two rough sides being in the middle and will get glued together . He cut these 4 pieces about 1/2 inch bigger all around. After gluing this piece it will be cut to final shape on the scroll saw. Paul is using the same rigging piece as mine in the front and a "D" ring in the back, same on both sides of course. The metal pieces will not go in until later. The two leather pieces will be pulled apart with a screwdriver and the metal placed up into the two layers and then riveted into position.


So now back at our house we each have at home two each of stirrup leathers and each of our rigging's , (each different). We are to get these tooled before we see Randy again. The possibility of ruining this nice leather with bad stamping is a little nerve wracking.
We will let you know how it turns out so be sure to stop back.
Comments